
Creating an Event
Eventixa gives you a complete event-management workflow inside WordPress. You can create an event, set its schedule, choose whether it is in-person, virtual, or hybrid, assign venues and organizers, configure tickets, collect attendee information, add speakers and sessions, and publish the event from one event editor.
Admin Location: Eventixa → Events → Add New Event
Available in: Eventixa Core
Additional Options: Some advanced features require Eventixa Pro
Create a New Event
Go to: Eventixa → Events → Add New Event
The Eventixa event editor opens.
Start by entering the main event information, then work through the available event settings before publishing.
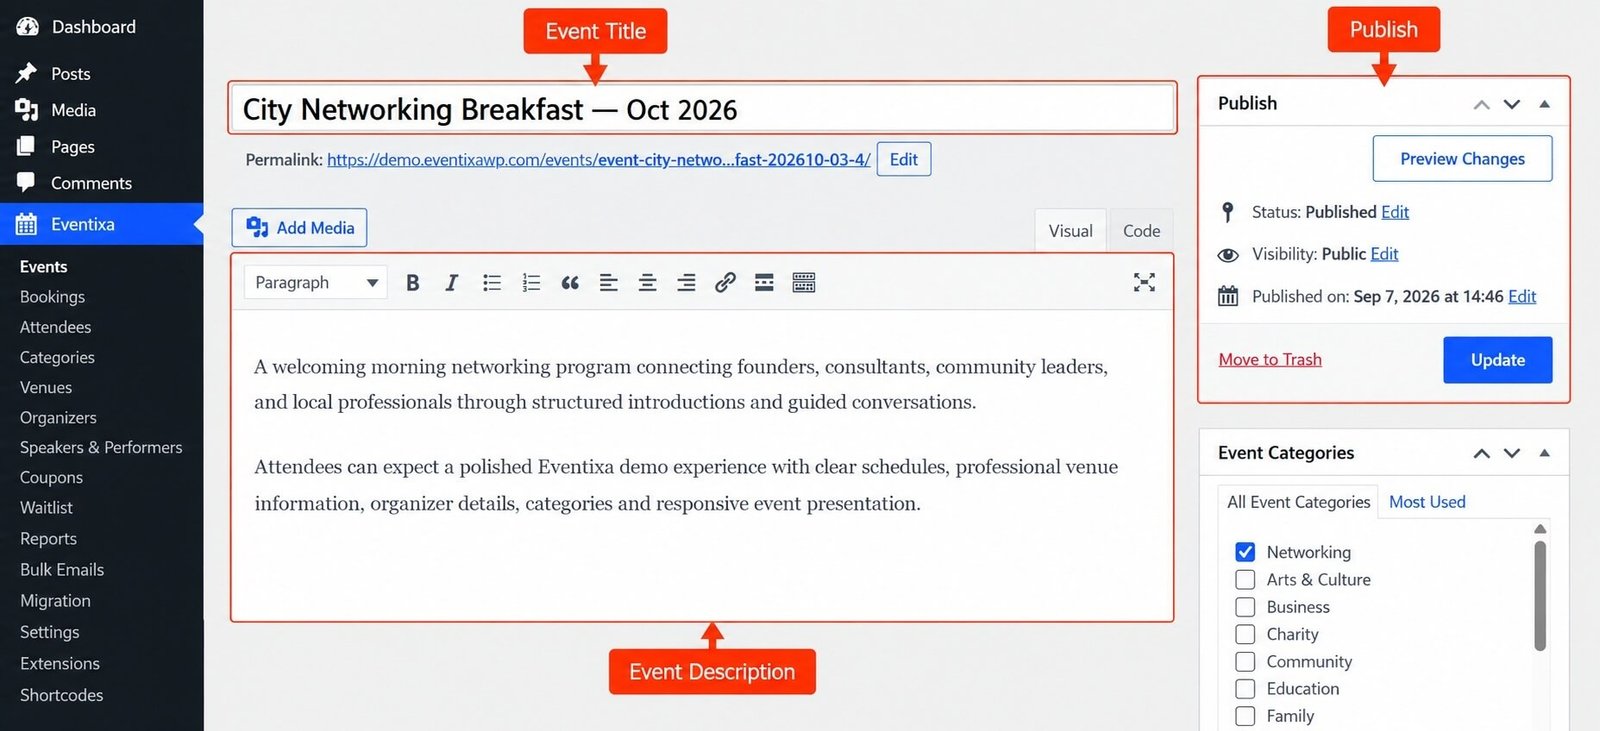
Add the Event Title
Enter a clear event title at the top of the editor.
For example: WordPress Community Summit 2026
The event title appears throughout Eventixa, including event listings, booking records, attendee information, emails, and the event’s frontend page.
Use a title that clearly identifies the event to both visitors and administrators.
Add the Event Description
Use the WordPress content editor to add the event description.
You can include information such as:
- Event overview
- What attendees can expect
- Agenda summary
- Important instructions
- Speaker information
- Registration notes
- Venue or virtual-access information
Keep the most important information near the beginning so visitors can quickly understand the event.
Add a Featured Image
Set a Featured Image for the event.
The featured image can be used in Eventixa event listings and on the Single Event page depending on the selected frontend layout.
Use a clear event image with suitable dimensions and avoid images containing important text that may become difficult to read on smaller screens.
Set the Event Date and Time
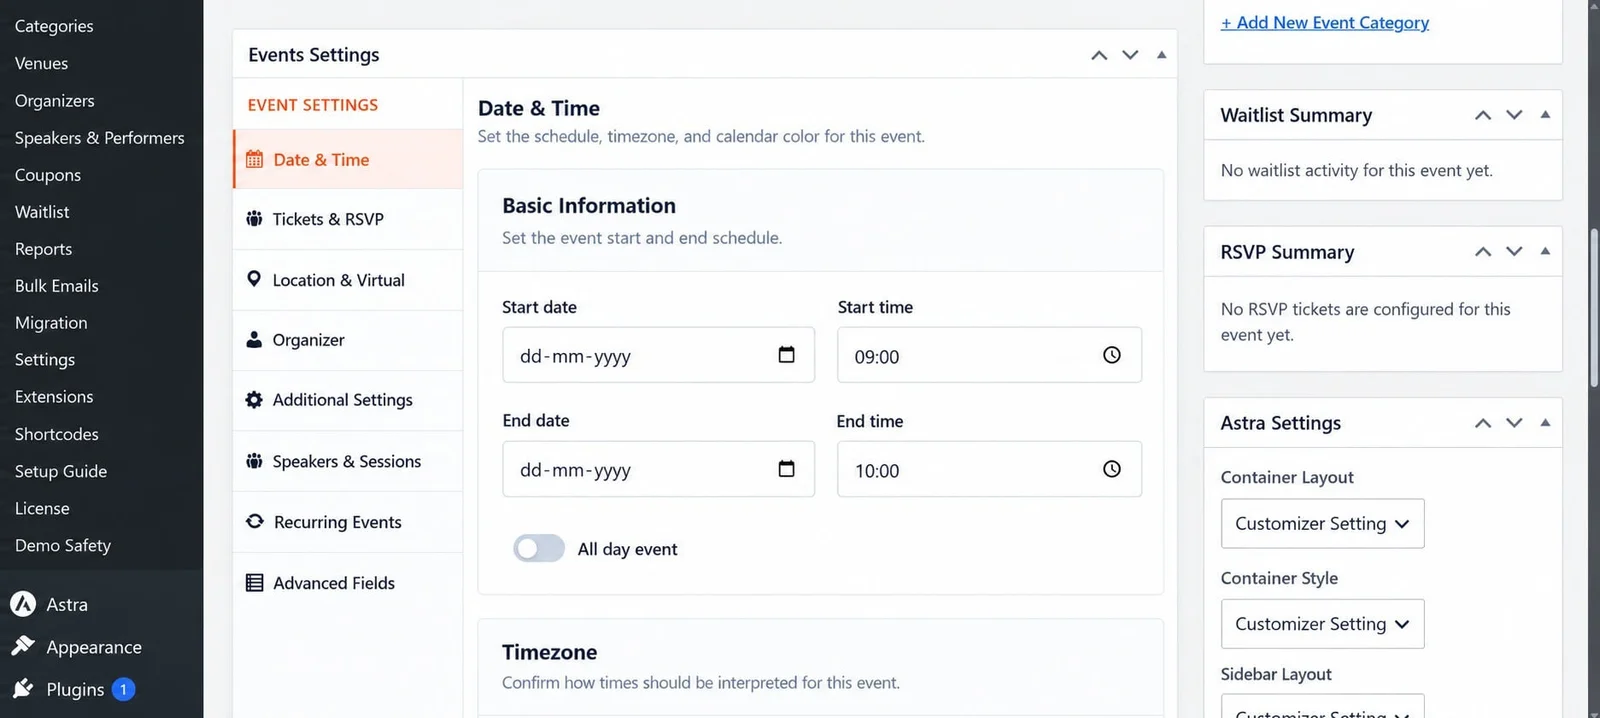
Configure the event schedule in the event editor.
The main schedule includes:
- Start Date
- Start Time
- End Date
- End Time
- All-Day option
- Timezone where applicable
Make sure the start and end information accurately represents the event.
Start Date
Choose the date on which the event begins.
For a normal single-day event, the start and end date can be the same.
End Date
Choose when the event ends.
Multi-day events can use different start and end dates.
Start Time
Enter the event start time.
This is used throughout the frontend event display and related Eventixa workflows.
End Time
Enter the event end time.
The end time should occur after the event start time for a normal timed event.
All-Day Event
Enable the All-Day option when the event does not need a specific start and end time.
This is useful for conferences, exhibitions, festivals, or similar events that are presented as all-day activities.
Event Timezone
Use the appropriate timezone for the event.
Correct timezone configuration is especially important for:
- Virtual events
- International audiences
- Recurring events
- Calendar-based schedules
- Time-sensitive ticket sales
Event Color
Eventixa can use an event color as part of the event’s visual presentation.
Choose an appropriate color when the option is available in your event configuration.
Event color can help distinguish events in calendar-style interfaces.
Choose the Event Type
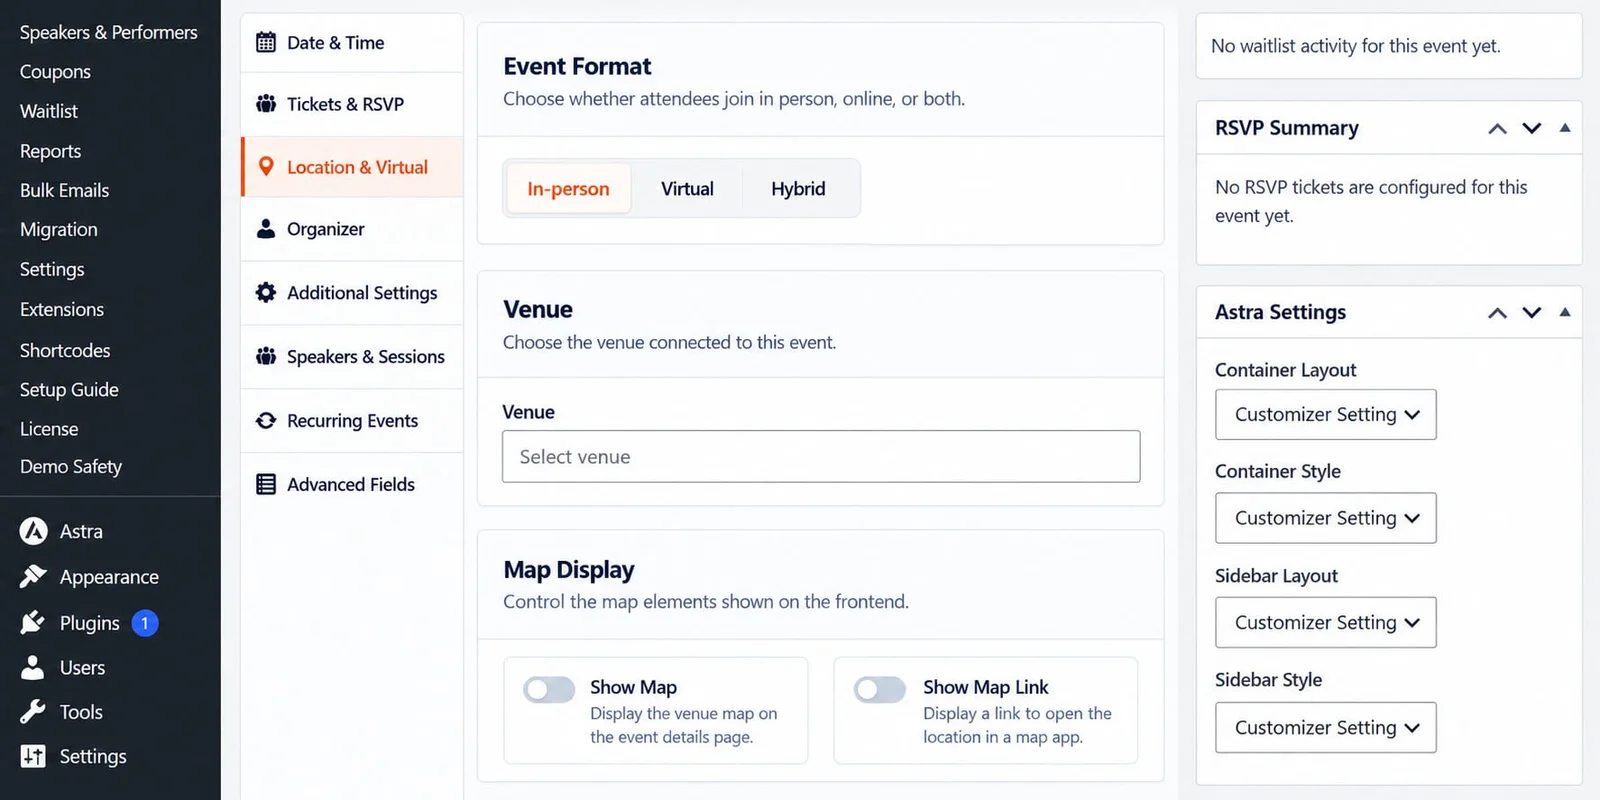
Eventixa supports different event-location formats.
Depending on the features available on your installation, you can create:
- In-Person events
- Virtual events
- Hybrid events
Choose the type that matches how attendees will participate.
In-Person Event
Use In-Person when attendees will physically attend a venue.
After selecting In-Person, assign the appropriate Eventixa venue.
Virtual Event
Use Virtual when attendees will join remotely.
Eventixa supports Custom Meeting URL in Core, while managed Zoom and Google Meet integrations are available with Eventixa Pro.
Virtual access can be controlled through Eventixa’s attendee-access workflow.
Hybrid Event
Use Hybrid when an event has both an in-person location and a virtual-access option.
A Hybrid event can combine a venue with supported virtual meeting information.
Assign a Venue
Choose an existing Eventixa venue or create the appropriate venue separately.
The venue can contain information such as:
- Venue name
- Address
- City
- State or region
- Country
- Postal code
- Contact information
- Map/location details
Assign the correct venue so visitors know where the event takes place.
Create a Venue First
If the required venue does not exist yet, create it from:
Eventixa → Venues
Then return to the event and select it.
For detailed venue management, see the Venues documentation.
Assign an Organizer
Select the organizer responsible for the event.
Organizer information can include:
- Organizer name
- Phone
- Website
Organizers can help visitors understand who is running the event and provide appropriate contact information.
Create an Organizer
If the organizer is not already available, go to:
Eventixa → Organizers
Create the organizer and then assign it to the event.
Assign Event Categories
Choose one or more Eventixa categories for the event.
Categories are useful for organizing events such as:
- Conferences
- Workshops
- Webinars
- Networking
- Training
- Festivals
Categories can also be used when filtering event listings through Eventixa shortcodes, Gutenberg blocks, and Elementor widgets.
Add Event Tickets
Create the tickets attendees will use to register for the event.
Eventixa supports different registration workflows, including standard paid/free tickets and RSVP tickets where available.
A ticket configuration can include information such as:
- Ticket name
- Price
- Capacity
- Sale schedule
- Minimum quantity
- Maximum quantity
- Registration fields
Free Tickets
Use a price of zero when registration is free but you still want to collect booking and attendee information.
A free ticket does not require a payment transaction.
Paid Tickets
Enter the appropriate ticket price for paid registration.
The payment methods available to the customer depend on the payment gateways enabled in Eventixa.
RSVP Tickets
Eventixa also supports RSVP-style registrations.
RSVP tickets use a different registration workflow from normal commerce tickets and can support responses such as:
- Going
- Not Going
See the RSVP Tickets documentation for the complete workflow.
Ticket Capacity
Set a capacity when the number of available registrations should be limited.
Capacity controls how many registrations can be accepted for that ticket.
If capacity is unlimited, configure the ticket accordingly.
Ticket Sale Schedule
Set ticket sale start and end dates when registration should only be available during a specific period.
This helps you open registration later or automatically close sales before the event.
Ticket Quantity Rules
You can control how many tickets a customer can select in one registration.
Depending on the ticket configuration, you can define minimum and maximum quantities.
Configure Attendee Registration Fields
Eventixa can collect information from attendees during registration.
Typical attendee information can include:
- First Name
- Last Name
You can also configure additional registration fields where supported.
Individual Attendee Information
When a customer selects multiple tickets, Eventixa can collect information for each attendee individually.
This is useful when the purchaser is registering multiple people.
Advanced Attendee Fields
Additional field types are available depending on the Eventixa features installed.
Use advanced fields when you need to collect information beyond standard attendee data.
Examples can include custom requirements, profile details, or event-specific registration information.
Add Speakers & Performers
Eventixa supports Speakers & Performers for professional event presentation.
You can assign participant profiles to an event and organize how they appear on the frontend.
Profiles can include information such as:
- Name
- Role or designation
- Photo
- Biography
- Social/profile information
- Group assignment
Use Speakers & Performers when your event includes presenters, performers, panelists, instructors, or similar participants.
Add Sessions
Events can also include sessions.
Sessions are useful for:
- Conference talks
- Workshops
- Panels
- Breakout sessions
- Performances
- Scheduled activities
A session can be associated with participants and displayed as part of the Eventixa event agenda.
Build an Event Agenda
Use Eventixa Sessions to create the event agenda.
The agenda can organize multiple sessions into a structured frontend schedule.
For recurring events, Eventixa Pro can support either the same agenda across occurrences or different agendas for individual occurrence dates.
Configure a Recurring Event
Eventixa Pro can turn an event into a recurring event.
Recurring events are useful when the same event happens repeatedly on a defined schedule.
Examples include:
- Weekly classes
- Monthly workshops
- Annual events
- Multi-date training programs
Configure the recurrence schedule and verify the generated occurrence dates before publishing.
Recurring Event Tickets
Recurring events can use occurrence-aware ticket registration.
Customers should register for the appropriate occurrence when the ticket workflow requires an occurrence selection.
Recurring Virtual Events
Recurring Virtual or Hybrid events can also use managed meeting workflows.
Depending on the provider, you can configure:
- Same meeting for all occurrences
- Separate meeting per occurrence
This is available for supported Pro meeting integrations.
Configure Virtual Access
For a Virtual or Hybrid event, select the appropriate virtual provider.
Current options can include:
- Custom Meeting URL
- Zoom with Eventixa Pro
- Google Meet with Eventixa Pro
Custom Meeting URL
Use Custom Meeting URL when you already have an external meeting or streaming link.
This does not require a global provider connection.
Zoom
With Eventixa Pro, you can connect Zoom and create or manage meetings directly from the Eventixa event workflow.
Google Meet
With Eventixa Pro, you can connect Google and create managed Google Meet sessions through Google Calendar.
Virtual Access Security
Do not expose private meeting links in normal public event content when the event requires controlled attendee access.
Use Eventixa’s Virtual Event access workflow instead.
Configure Coupons
If your event uses paid tickets and coupons are available, you can create Eventixa coupons for discounts.
Coupon behavior can depend on:
- Discount type
- Discount amount
- Eligible event
- Eligible ticket
- Usage limits
- Validity period
- Additional advanced rules where available
Coupons are managed separately from the main event editor.
Configure Waitlist
Eventixa Pro provides Waitlist functionality for sold-out tickets.
The global Waitlist feature is configured under:
Eventixa → Settings → Tickets → Waitlist
When the ticket becomes eligible for waitlisting, visitors can join the queue according to the configured Waitlist rules.
Configure Payments
Before selling paid tickets, make sure at least one suitable payment workflow is enabled.
Depending on your Eventixa installation, payment options can include:
- PayPal
- Offline Payment
- Stripe
- WooCommerce Checkout
The exact gateways available depend on Core/Pro configuration.
Configure Event Emails
Eventixa sends configured customer and administrator emails during registration workflows.
Before launching the event, review your email settings and templates.
Test important emails such as:
- Booking confirmation
- Ticket delivery
- RSVP notifications
- Waitlist notifications where applicable
Review the Event Before Publishing
Before publishing, verify the main event configuration.
Check:
- Event title
- Description
- Featured image
- Date
- Time
- Timezone
- Event type
- Venue
- Organizer
- Category
- Tickets
- Capacity
- Sale schedule
- Registration fields
- Speakers
- Sessions
- Recurrence
- Virtual access
- Payment configuration
Publish the Event
When the event configuration is ready, click Publish.
The event becomes available through the Eventixa frontend according to its WordPress status, date, and display configuration.
View the Event
After publishing, open the event on the frontend.
Review the Single Event page as a normal visitor.
Check:
- Event title
- Event image
- Description
- Schedule
- Venue
- Organizer
- Speakers
- Agenda
- Ticket form
- Virtual-event information where applicable
Test Registration Before Launch
Complete at least one real test registration before promoting the event.
Use the same workflow your attendees will use.
For a paid event, test the relevant gateway in a suitable test environment before accepting live payments.
Test a Standard Ticket Booking
Verify:
- Ticket selection works.
- Quantity rules work.
- Attendee fields appear correctly.
- Checkout opens.
- Booking is created.
- Payment status is correct.
- Attendee records are created.
- Ticket email is sent where applicable.
- Capacity updates correctly.
Test Free Registration
For a free ticket, confirm the customer can complete the registration without being asked for unnecessary payment information.
Test RSVP
If the event uses RSVP, test both available responses where applicable.
Confirm the correct ticket and check-in behavior is applied to Going and Not Going attendees.
Test Recurring Events
For recurring events, test multiple occurrences.
Check that the correct occurrence is shown in:
- Event date
- Ticket selection
- Checkout
- Booking
- Attendee record
- Agenda
- Virtual access
Test Virtual Events
For Virtual or Hybrid events, test the access experience from a real customer account.
Confirm that managed meeting URLs are not exposed earlier or more broadly than intended.
Test Mobile Display
Open the event from a mobile device or responsive browser preview.
Check:
- Event content
- Ticket selection
- Attendee fields
- Checkout
- Buttons
- Agenda
- Speakers
- Venue information
Common Problems
Event Does Not Appear on the Frontend
Check:
- Event is published.
- Event date is valid.
- Eventixa listing filters are not excluding it.
- Event category/venue/organizer filters are not hiding it.
- The event listing page is configured correctly.
Ticket Form Does Not Appear
Check:
- The event has tickets.
- Ticket sale has started.
- Sale has not ended.
- Capacity is available.
- Ticket configuration is valid.
Event Time Is Incorrect
Verify the event timezone and WordPress timezone configuration.
For recurring events, also verify the occurrence schedule.
Venue Is Missing
Confirm a venue was assigned to the event.
Organizer Is Missing
Confirm an Eventixa organizer was selected.
Speakers Are Not Showing
Check that participants were assigned to the event and that the relevant frontend presentation settings are enabled.
Agenda Is Empty
Confirm sessions were created and assigned to the event.
For recurring events, verify the correct agenda mode and occurrence date.
Virtual Meeting Is Missing
Check:
- Event is Virtual or Hybrid.
- Provider is selected.
- Managed provider is connected where required.
- Meeting was created or linked.
- Virtual-access conditions are satisfied.
Recurring Dates Are Wrong
Review:
- Recurrence frequency
- Interval
- Weekdays
- Start/end range
- Excluded dates
- Additional dates
Verify the generated occurrence list before opening registration.
Booking Works but Email Is Missing
Review Eventixa Email settings and the WordPress mail-delivery configuration.
Recommended Event Creation Workflow
For most events, use this order:
- Create the event.
- Add title and description.
- Add the featured image.
- Configure date and time.
- Select In-Person, Virtual, or Hybrid.
- Assign the venue.
- Assign the organizer.
- Select categories.
- Create tickets.
- Configure attendee fields.
- Add speakers and performers if needed.
- Add sessions and agenda if needed.
- Configure recurrence if needed.
- Configure virtual access if needed.
- Review payments and emails.
- Publish the event.
- Test the complete frontend registration workflow.
Important Notes
- Events are created from Eventixa → Events → Add New Event.
- Add accurate start/end dates, times, and timezone information.
- Eventixa supports In-Person, Virtual, and Hybrid events.
- Assign venues and organizers where appropriate.
- Categories help organize and filter Eventixa listings.
- Tickets can be free, paid, or RSVP depending on the registration workflow.
- Ticket capacity and sale schedules should be reviewed before publishing.
- Attendee fields determine what registration information is collected.
- Speakers & Performers and Sessions can be added to professional events.
- Recurring events require Eventixa Pro.
- Zoom and Google Meet managed integrations require Eventixa Pro.
- Always test the complete registration workflow before promoting the event.


