
Venues
Eventixa venues let you save reusable physical locations and assign them to multiple in-person or hybrid events.
Instead of entering the same event location repeatedly, create the venue once and reuse it whenever needed.
Available in: Eventixa Core
Location: Eventixa → Venues
Used by: In-Person and Hybrid events
Open the Venues Screen
Go to: Eventixa → Venues
From here, you can:
- Create a new venue
- Edit an existing venue
- Review venue details
- Reuse venues across multiple events
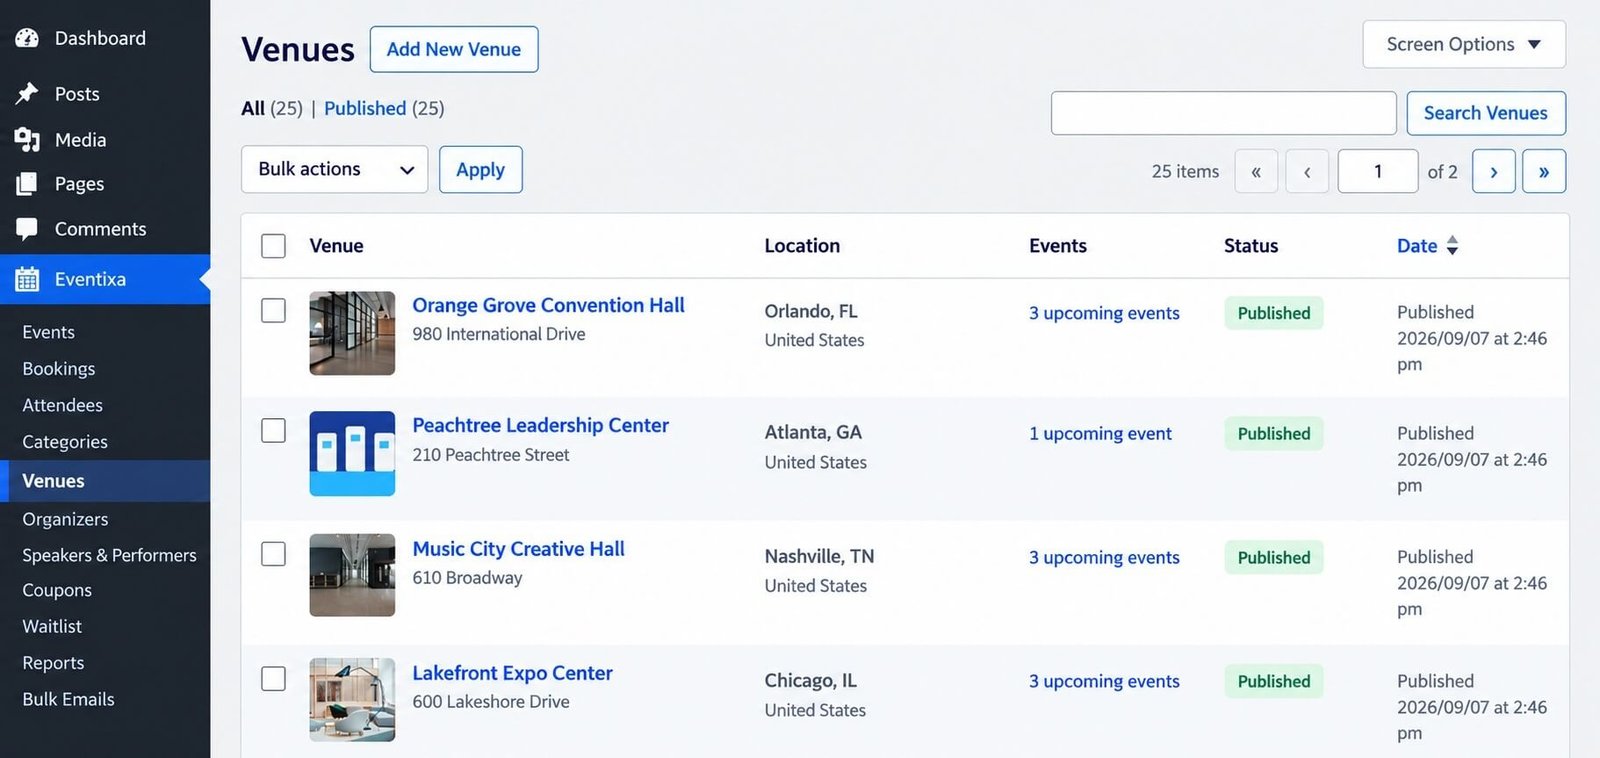
Create a New Venue
To create a venue:
- Go to Eventixa → Venues.
- Click Add New Venue.
- Enter the venue name.
- Add the location details.
- Add any other required venue information.
- Save the venue.
The venue will then be available when creating or editing an event.
Venue Name
Use the actual name visitors should recognize.
Examples:
- Austin Innovation Hub
- Manhattan Summit Center
- Community Training Center
- Riverside Expo Center
Avoid using temporary names such as:
- Venue 1
- Main Location
- Test Venue
unless those names are genuinely meaningful to your organizers.
Venue Location
Add the physical location information required for visitors to find the event.
Depending on your Eventixa configuration, venue information can include:
- Address
- City
- State or region
- Postal code
- Country
- Location details
Enter the address consistently so it displays correctly across your events.
Map Display
Eventixa can provide map-related display options for physical event locations.
While editing an event under: Event Settings → Location & Virtual you can control options such as:
- Show Map
- Show Map Link
Show Map
Displays the venue map on the frontend event page when the required mapping configuration is available.
Show Map Link
Displays a link visitors can use to open the event location in a map application.
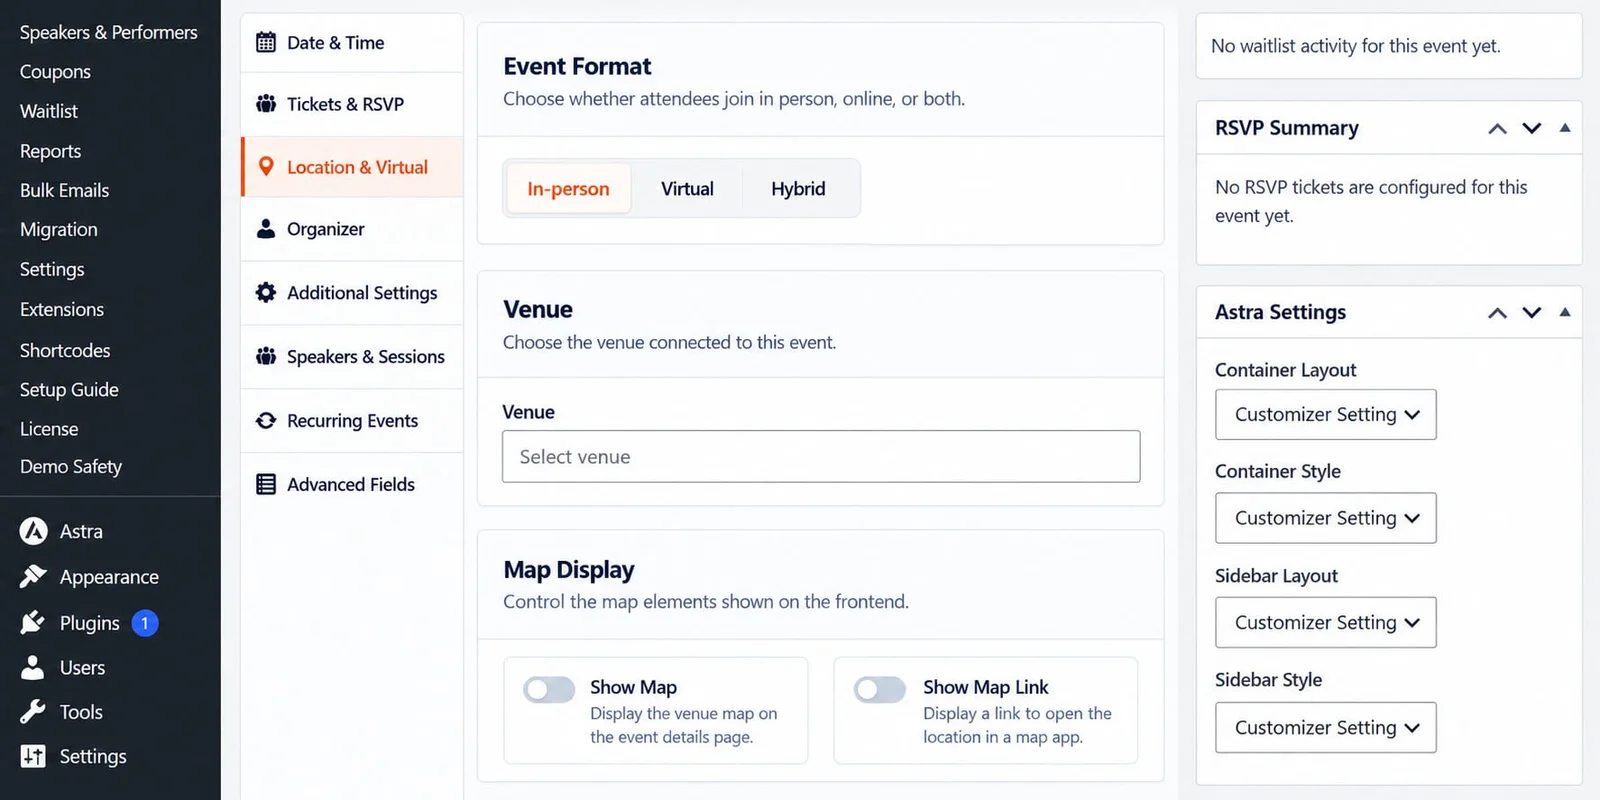
Assign a Venue to an Event
Edit an event and open: Event Settings → Location & Virtual
Choose: In-Person or: Hybrid
Then select the venue from the Venue field.
The selected venue becomes associated with that event.
In-Person Events
For an in-person event, the venue identifies where attendees should physically arrive.
Typical examples include:
- Conferences
- Workshops
- Networking events
- Exhibitions
- Training sessions
Make sure the venue information is accurate before publishing the event.
Hybrid Events
Hybrid events can use both:
- A physical venue
- Virtual meeting access
The venue is used for attendees participating in person, while the virtual configuration provides access for remote attendees.
Reuse a Venue
The same venue can be assigned to multiple events.
For example: Austin Innovation Hub could be used for:
- Product Innovation Workshop
- Startup Networking Evening
- WordPress Training Day
This helps keep location information consistent across your site.
Edit an Existing Venue
Go to: Eventixa → Venues
Open the venue you want to modify.
Update the required information and save the changes.
Because venues are reusable, changes can affect multiple events that use the same venue.
Review active events before making major location changes.
Changing a Venue After Registrations Start
You can change the venue assigned to an event, but use extra care when attendees have already registered.
If the physical location changes:
- Update the event venue.
- Review the event page.
- Check map information.
- Notify registered attendees.
- Review reminder emails or event instructions.
A venue change is important enough that attendees should normally be informed directly.
Delete a Venue
Before deleting a venue, check whether existing or upcoming events still use it.
For historical venues that are no longer used, you may prefer to keep the record if old events still reference it.
Avoid deleting a venue that is still required by active events.
Venue Naming Best Practices
Use clear and consistent names.
Good:
- Austin Innovation Hub
- Riverside Expo Center
- Downtown Conference Hall
Avoid unnecessary repetition such as:
- Austin Innovation Hub Venue
- Riverside Expo Center Event Venue
unless that wording is part of the official location name.
Common Venue Problems
Venue Does Not Appear in the Event Editor
Check that:
- The venue has been saved.
- You are editing an In-Person or Hybrid event.
- The event editor has been refreshed.
Map Does Not Display
Check:
- The venue has valid location information.
- Map display is enabled.
- The required map integration is configured.
- Your site is not blocking the required map service.
Wrong Venue Appears on the Event
Edit the event and open: Location & Virtual
Select the correct venue and update the event.
Venue Address Changed
Update the reusable venue record if all associated events should use the new address.
If only one event is moving, consider creating a separate venue instead of changing a shared venue used by other events.
Before Publishing
For an in-person or hybrid event, verify:
- Venue name
- Address
- Event format
- Map display
- Map link
- Frontend location information
Then preview the event page before opening registration.
Related Documentation
Continue with:


