
Creating Event Tickets
Eventixa lets you create one or more ticket types for an event.
Each ticket can have its own name, description, price, capacity, sale schedule, quantity limits, and attendee information requirements.
Available in: Eventixa Core
Location: Eventixa → Events → Edit Event → Tickets & RSVP
Related features: Checkout, Bookings, Attendees, Payments, Waitlist
Open Tickets & RSVP
Go to: Eventixa → Events
Create a new event or edit an existing one.
Then open: Event Settings → Tickets & RSVP
This section contains the event’s standard tickets and RSVP registrations.
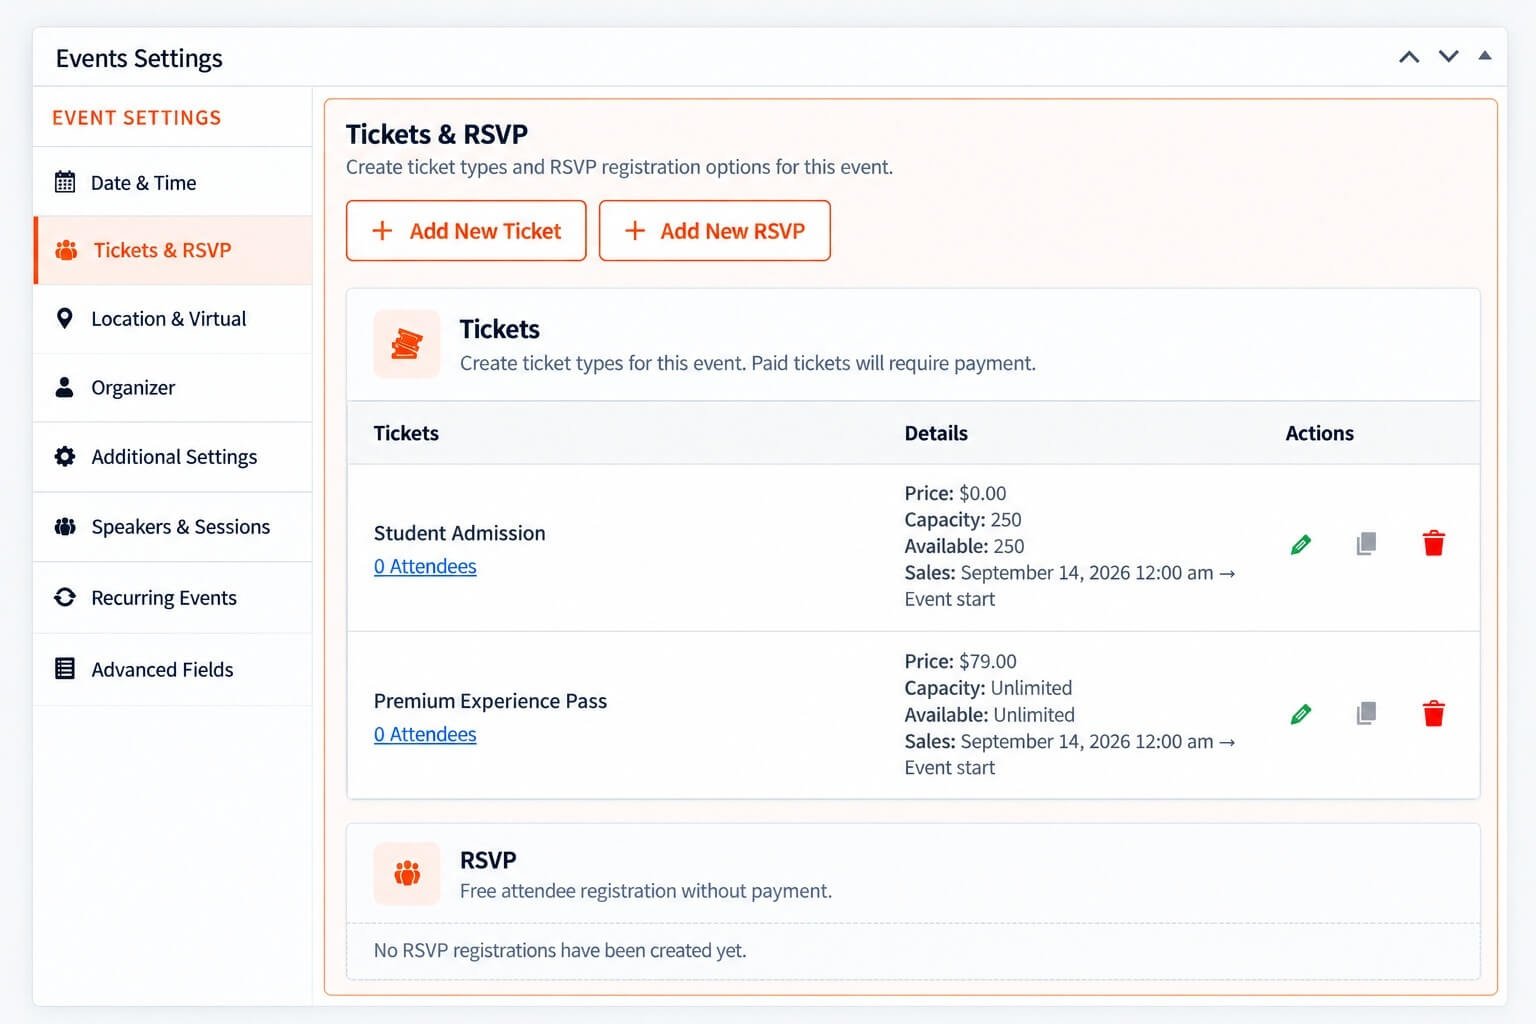
Add a New Ticket
Click: Add New Ticket
Eventixa opens the ticket editor.
From here, you can configure the ticket before saving it.
Ticket Name
Enter the visitor-facing name of the ticket.
Examples:
- General Admission
- Student Admission
- VIP Pass
- Early Bird
- Premium Experience Pass
- Workshop Ticket
Use names that clearly explain the ticket tier.
Ticket Description
Add a short description explaining what the ticket includes.
For example:
Premium Experience Pass
Premium admission with enhanced event access and additional attendee benefits.
Keep the description concise and useful.
If enabled, this description can appear on the frontend ticket form.
Show Description on Frontend
Where available, enable the option to show the ticket description on the frontend.
Use this when attendees need extra information before choosing a ticket.
For simple ticket types, a short name may already be enough.
Set the Ticket Price
Enter the ticket price.
Examples:
0for a free ticket19for a $19 ticket79for a $79 ticket
A ticket with a zero price is treated as a free registration.
A ticket with a price greater than zero requires the applicable checkout and payment workflow.
Free Ticket Example
You could create:
Ticket: Student Admission
Price: Free
Capacity: 100
Visitors still register through Eventixa, but no payment is required.
Paid Ticket Example
You could create:
Ticket: Standard Event Pass
Price: $19
Capacity: 250
Visitors choose the ticket and complete payment through an enabled payment method.
Configure Capacity
Capacity controls how many registrations the ticket can accept.
For example:
Capacity: 250
Eventixa tracks available quantity as bookings are created.
If the ticket should not have a fixed limit, use the supported unlimited-capacity option where available.
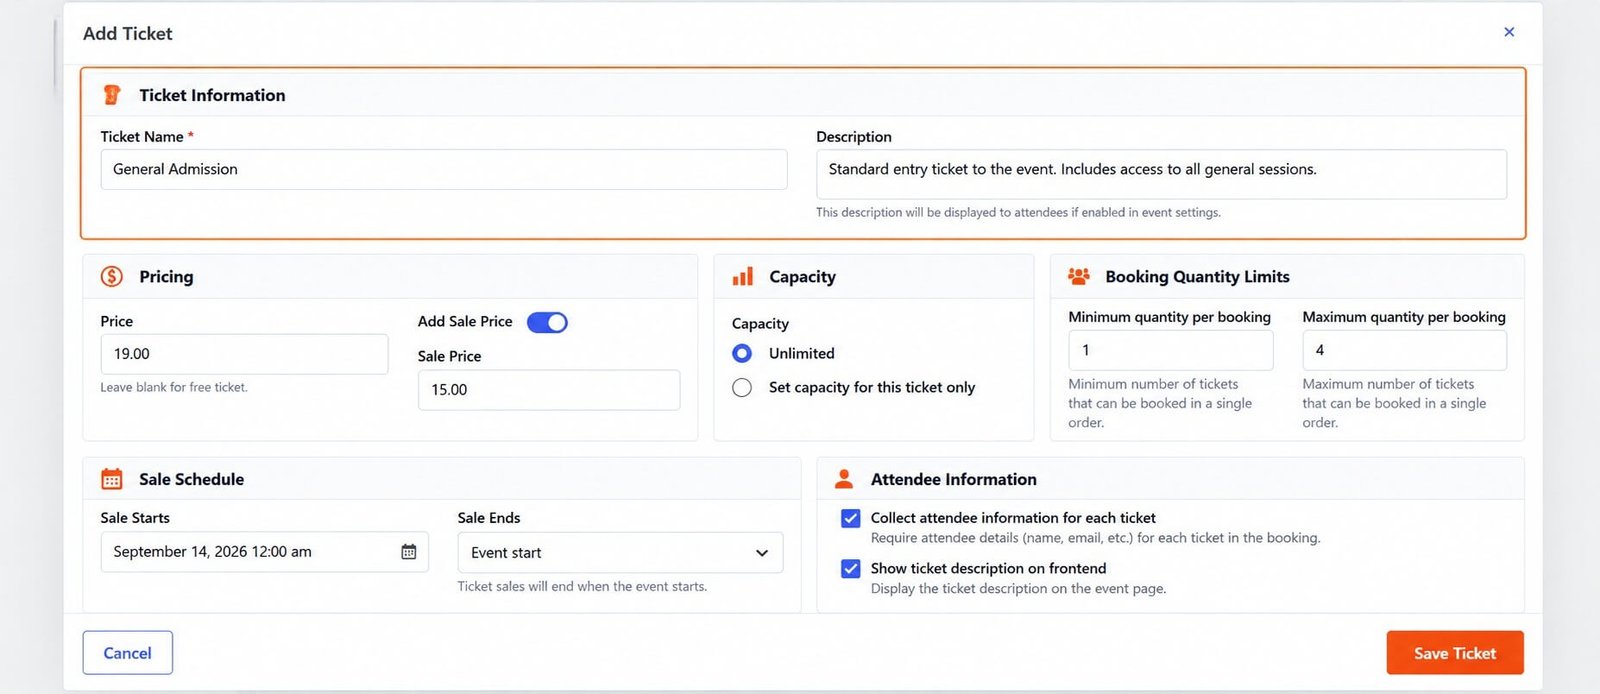
Unlimited Capacity
An unlimited ticket does not stop sales based on a fixed ticket quantity.
This can be useful for:
- Virtual events
- Livestream registrations
- High-capacity online sessions
Even with unlimited capacity, sale dates and quantity rules can still apply.
Ticket Availability
Eventixa calculates availability based on the ticket configuration and booking state.
Availability can depend on:
- Capacity
- Existing registrations
- Pending reservations
- Sale dates
- Event schedule
The frontend can show remaining or unlimited availability to visitors.
Sale Start
Set when ticket sales should begin.
For example:
Sale starts: September 14, 2026 at 12:00 AM
Before this time, the ticket should not be available for normal purchase.
Sale End
Set when ticket sales should stop.
You can use:
- A specific date and time
- Event start, where supported
Using Event start is useful when registration should remain open until the event begins.
Ticket Sale Example
| Setting | Value |
|---|---|
| Sales Start | September 14, 2026 |
| Sales End | Event start |
This lets visitors register from the configured start date until the event begins.
Minimum Quantity
Set the minimum number of tickets a purchaser can select.
Example:
Minimum: 1
This is the normal setting for most events.
Maximum Quantity
Set the maximum number of tickets allowed in one booking.
Example:
Maximum: 4
This prevents a single purchaser from reserving more than four tickets in one transaction.
Quantity Example
If the ticket is configured as:
Min: 1
Max: 4
the frontend quantity selector allows the purchaser to choose between one and four tickets, subject to remaining availability.
Attendee Information
Depending on the event configuration, Eventixa can collect information for the attendees included in the booking.
For multiple-ticket purchases, individual attendee information can be collected separately.
Common attendee information includes:
- Name
Additional attendee fields can be configured elsewhere.
Required Attendee Fields
Use required fields when the information is necessary for:
- Ticket delivery
- Check-in
- Event communication
- Registration records
Do not require unnecessary information.
Save the Ticket
After configuring the ticket:
- Review the ticket name.
- Check the description.
- Confirm the price.
- Review capacity.
- Check sale dates.
- Verify quantity rules.
- Review attendee settings.
- Click Save Ticket.
The ticket is then added to the event.
Review the Ticket List
After saving, the Tickets section displays the created ticket.
The list can show details such as:
- Ticket name
- Price
- Capacity
- Availability
- Sale period
- Attendee count
You can also use available actions to:
- Edit
- Duplicate
- Delete
Edit a Ticket
Use the edit action to update an existing ticket.
You can change settings such as:
- Name
- Description
- Price
- Capacity
- Sale schedule
- Quantity limits
Be careful when changing tickets that already have registrations.
Duplicate a Ticket
The duplicate action is useful when creating several similar ticket tiers.
For example:
- Create General Admission.
- Duplicate it.
- Rename the copy VIP Admission.
- Change the price and capacity.
- Save.
This can be faster than configuring every ticket from scratch.
Delete a Ticket
Before deleting a ticket, check whether it already has attendees or bookings.
If registrations exist, deleting the ticket can affect event operations.
If you only want to stop future sales, closing the sale schedule may be more appropriate.
Create Multiple Ticket Types
An Eventixa event can have multiple standard tickets.
For example:
Student Admission
- Free
- Capacity: 100
Standard Event Pass
- $19
- Capacity: 250
VIP Pass
- $79
- Capacity: 25
This gives attendees multiple registration options on the same event.
Frontend Ticket Display
Published tickets appear on the event page when they are currently available.
The ticket area can show:
- Ticket name
- Description
- Price
- Availability
- Quantity controls
- Minimum and maximum quantities
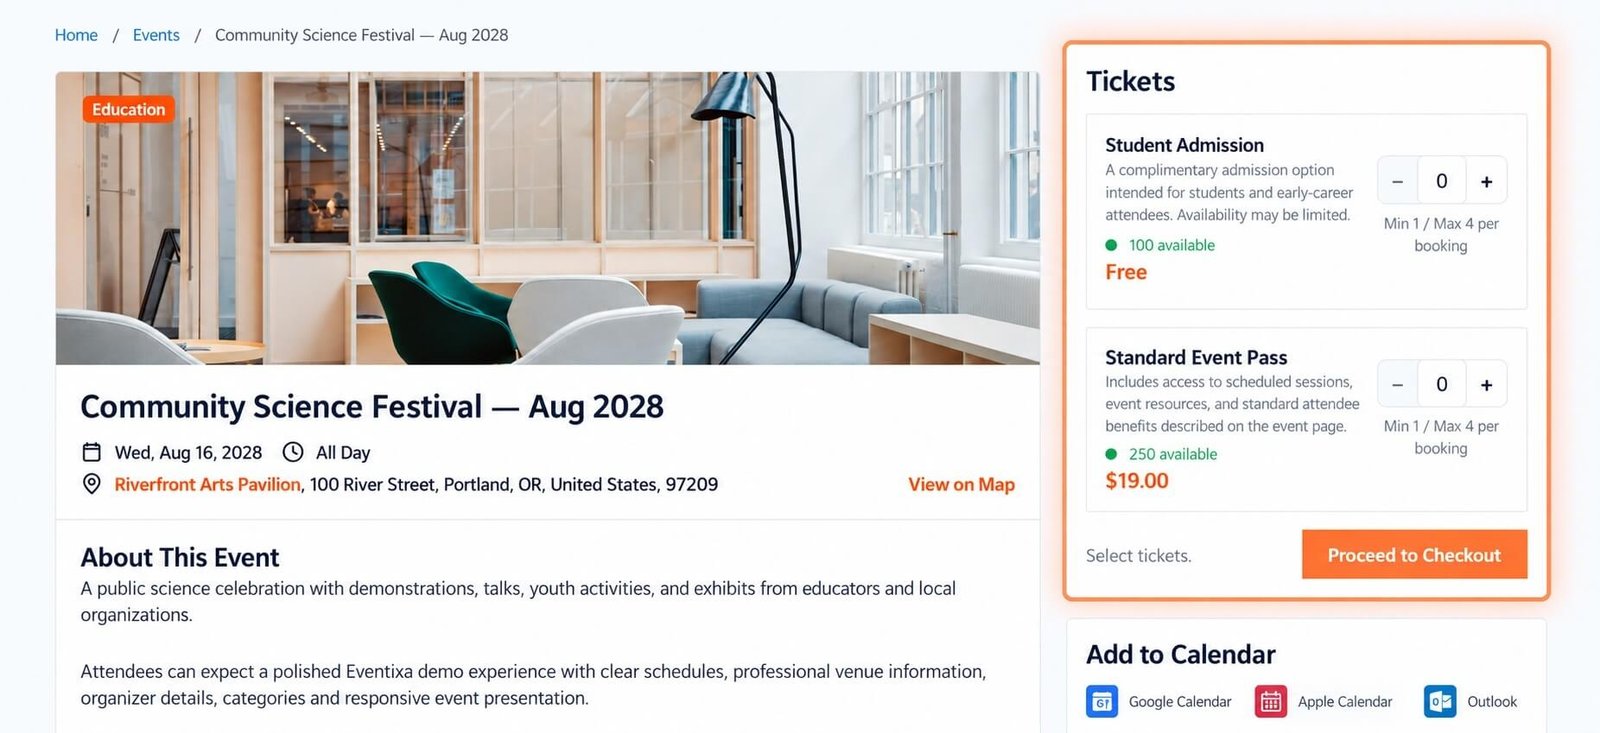
Selecting Tickets
Visitors use the plus and minus controls to choose the required quantity.
The frontend respects:
- Minimum quantity
- Maximum quantity
- Remaining availability
Once a valid quantity is selected, the visitor can continue to checkout.
Proceed to Checkout
For standard tickets, the visitor selects one or more ticket quantities and clicks:
Proceed to Checkout
The next steps depend on whether the registration is free or paid.
Free Ticket Checkout
For free tickets:
- Select the ticket.
- Enter required attendee information.
- Complete registration.
- Eventixa creates the booking.
- Attendee records are created.
No payment transaction is required.
Paid Ticket Checkout
For paid tickets:
- Select the ticket.
- Enter attendee information.
- Proceed to checkout.
- Choose an available payment method.
- Complete payment.
- Eventixa creates or finalizes the booking.
Payment Methods
Paid-ticket checkout can use enabled Eventixa payment methods.
Depending on your setup, these can include:
- PayPal
- Offline Payment
- WooCommerce
- Stripe with Eventixa Pro
Payment gateways are configured separately.
Ticket and Event Capacity
Ticket capacity and event-level capacity can interact.
When creating multiple ticket types, make sure the total registration strategy matches the physical or operational capacity of the event.
For example, do not create three ticket types with large capacities if the venue only holds a much smaller number of attendees unless the intended setup accounts for this.
Ticket Capacity After Booking
As registrations are completed, Eventixa updates availability.
For example:
Initial capacity: 100
Registered: 25
Available: 75
Pending reservation logic can also affect temporarily available stock during checkout.
Ticket Capacity After Cancellation
When an eligible booking is cancelled, capacity can be released back to the relevant ticket.
This allows the place to become available again.
Ticket Sale Schedule and Event Date
Make sure sale dates align with the event date.
Common mistakes include:
- Sale ending before intended registration closes
- Sale starting after the event
- Reusing old sale dates after duplicating an event
Always review sale dates after changing the event schedule.
Recurring Event Tickets
Recurring events can also use standard Eventixa tickets.
For recurring events, test ticket behavior across multiple occurrences rather than only the first date.
See Recurring Event Tickets for details.
Ticket Duplication and Event Duplication
If an event is duplicated, review all copied ticket configuration.
Check:
- Prices
- Capacities
- Sale dates
- Quantity rules
- Attendee fields
The new event may have a different schedule or registration strategy.
Common Problems
Ticket Does Not Appear on the Frontend
Check:
- Ticket is saved.
- Event is published.
- Sale period is active.
- Capacity remains.
- Event has not ended.
Ticket Shows Sold Out
Check:
- Capacity
- Existing bookings
- Pending checkout reservations
Price Shows Free
Verify the ticket price is greater than zero and saved correctly.
Quantity Cannot Be Increased
Check:
- Maximum quantity
- Remaining availability
- Other selected ticket quantities
Proceed to Checkout Is Disabled
Make sure a valid ticket quantity has been selected.
Sale Dates Are Wrong After Duplicating the Event
Edit the copied ticket and update its sale schedule for the new event.
Recommended Workflow
- Create or edit the event.
- Open Tickets & RSVP.
- Click Add New Ticket.
- Enter the ticket name.
- Add a description.
- Set the price.
- Configure capacity.
- Configure sale dates.
- Set min/max quantities.
- Configure attendee requirements.
- Save the ticket.
- Preview the event page.
- Select a ticket.
- Complete a test checkout.
- Confirm booking and attendee records.
Important Notes
- Create separate ticket types for meaningfully different registration options.
- Use clear visitor-facing names.
- Keep ticket descriptions concise.
- Check capacity before registration opens.
- Review sale dates carefully.
- Test min/max quantities.
- Never launch a paid event without completing a test payment workflow.
- Review existing registrations before deleting tickets.


