
The Advanced Fields module in Eventixa Pro allows you to create reusable custom attendees fields that can be assigned to your events. These fields are useful for displaying additional event information that is not included in the default event settings.
Instead of creating separate fields for every event, you define them once in Settings → Advanced Fields and reuse them across multiple events.
Advanced Fields can be displayed on the event page, hidden from visitors, or shown only to specific audiences based on your visibility settings.
Available in: Eventixa Pro
Why Use Advanced Fields?
Advanced Fields provide a flexible way to store structured event information without modifying the plugin or writing custom code.
Common use cases include:
- Dress Code
- Parking Information
- Registration Deadline
- Age Restrictions
- Speaker Profile Links
- Live Stream URL
- Sponsor Website
- Certificate Information
- Event Language
- Venue Capacity
- Food Preferences
- Health & Safety Instructions
Opening Advanced Fields
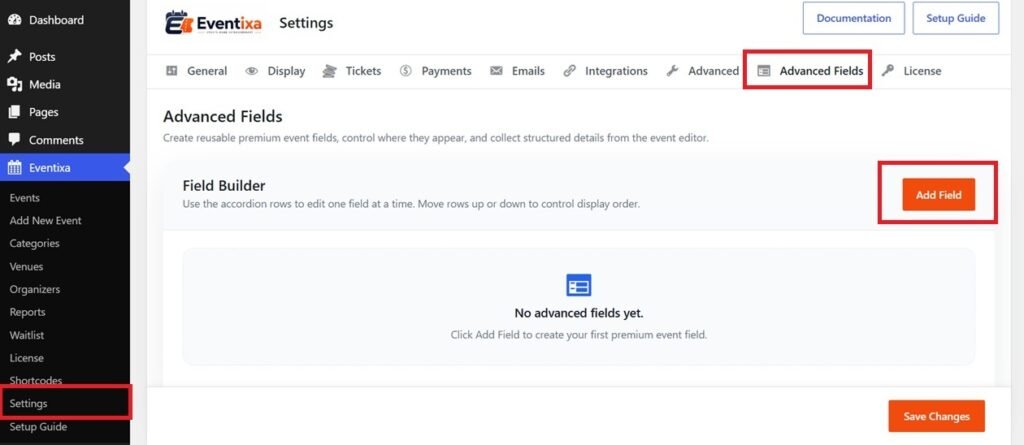
Navigate to:
Eventixa → Settings → Advanced FieldsThis page allows you to create and manage all reusable fields used throughout your events.
Creating a New Field
Click Add Field to create a new custom field.
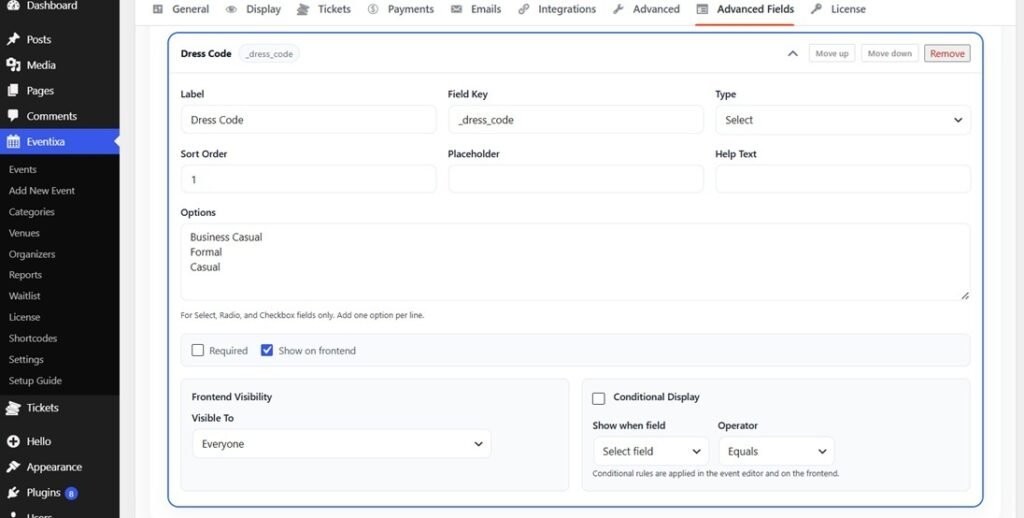
Each field includes several configuration options.
Field Label
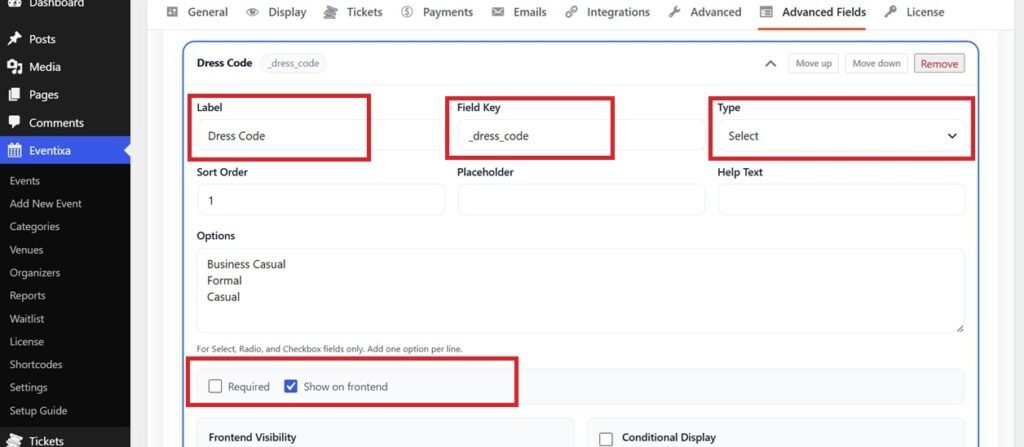
The Field Label is the name displayed to administrators and visitors.
Examples:
- Dress Code
- Parking
- Live Stream
- Event Language
- Sponsor Website
Choose a short and descriptive label.
Field Key
Every field automatically receives a unique key.
Example:
Dress Codebecomes
dress_codeThe key uniquely identifies the field internally and should remain unchanged once the field is in use.
Field Type
Choose how the value will be entered.
Text
Displays a single-line input.
Best for:
- Speaker Name
- Company
- City
- Language
Textarea
Allows multiple lines of text.
Best for:
- Event Notes
- Parking Instructions
- Visitor Information
- Terms & Conditions
Number
Accepts numeric values only.
Examples:
- Maximum Capacity
- Minimum Age
- Available Seats
Stores an email address.
Example:
events@example.comPhone
Stores telephone numbers.
Example:
+1 555 123 4567URL
Stores website links.
Examples:
- Sponsor Website
- Speaker Website
- Live Stream URL
Date
Displays a date picker.
Examples:
- Registration Deadline
- Certificate Release Date
Time
Displays a time picker.
Examples:
- Gate Opens
- Networking Starts
- VIP Entry Time
Select
Displays a dropdown list.
Example:
Language

English
Spanish
French
German
The visitor or administrator selects one option.
Radio Buttons
Displays multiple options where only one can be selected.
Example:
Meal Preference

○ Vegetarian

○ Vegan

○ Regular
Checkboxes
Allows selecting multiple values.
Example:
Facilities

☑ Parking

☑ Wi-Fi

☑ Lunch

☑ Wheelchair Access
Image
Stores an image.
Useful for:
- Sponsor Logo
- Event Badge
- Venue Map
File
Uploads downloadable files.
Examples:
- Event Brochure
- PDF Schedule
- Presentation Slides
Placeholder
The placeholder appears inside empty input fields.
Example:
Enter Dress Codeor
https://Placeholders help administrators understand what information should be entered.
Help Text
Help Text provides additional guidance below the field.
Example:
Enter the Zoom meeting URL for attendees.or
Visible only after registration.Help text is optional but recommended.
Required Field
Enable Required when a value must always be entered.
When enabled:
- Empty values cannot be saved.
- Administrators are prompted to complete the field.
Use this for important information such as:
- Live Stream URL
- Registration Deadline
- Venue Instructions
Default Value
Specify a value that is automatically filled when creating a new event.
Example:
Business Casualfor
Dress CodeAdministrators can still change the value later.
Options
Option-based fields (Select, Radio, Checkbox) require one or more options.
Example:
Language

English

Spanish

French

German
Each option contains:
- Label
- Value
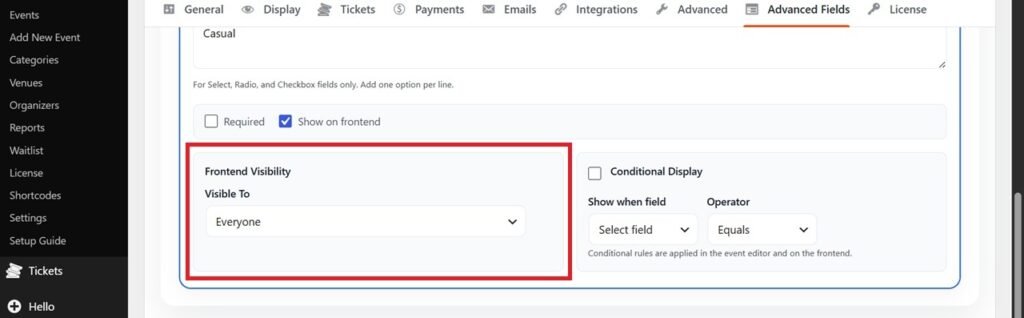
Frontend Visibility
Choose where the field is displayed.
Visibility settings allow you to control who can see the information.
Typical examples include:
- Everyone
- Logged-in users only
- Logged-out visitors only
- Hidden
This is useful for information such as attendee instructions or exclusive access details.
Assigning Advanced Fields to an Event
After creating your reusable fields:
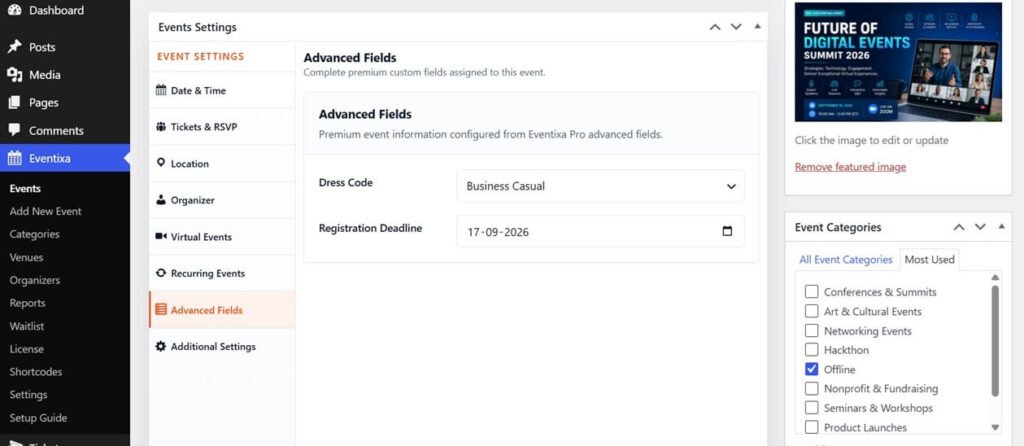
- Open an event.
- Navigate to the Advanced Fields tab.
- Enter the required values.
- Save or update the event.
Each event stores its own values while sharing the same reusable field definitions.
Frontend Display
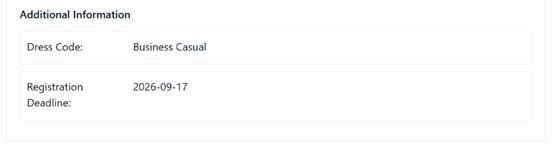
When a field contains a value and its visibility allows it, Eventixa automatically displays the information on the Single Event page.
Typical presentation:
Additional Information

Dress Code
Business Casual

Parking
Free parking available behind Hall B.

Live Stream
https://zoom.us/...

Registration Deadline
September 15, 2026
Fields without values are automatically hidden.
Editing Existing Fields
You can modify:
- Label
- Placeholder
- Help Text
- Default Value
- Visibility
- Options
Changes apply wherever the field is used.
Reordering Fields
Fields can be reordered from the Advanced Fields page.
The same order is used when displaying them inside the Event Editor and on the frontend.
Deleting Fields
Deleting a field removes it from future use.
Before deleting a field, verify that it is no longer required by existing events.
Best Practices
- Use short, descriptive labels.
- Group related fields together.
- Use dropdowns instead of free text when possible.
- Add help text for complex fields.
- Use default values for commonly repeated information.
- Keep required fields to a minimum.
- Hide sensitive information using frontend visibility settings when appropriate.
Example Configuration
Dress Code
| Setting | Value |
|---|---|
| Label | Dress Code |
| Type | Select |
| Required | No |
| Options | Business Casual, Formal, Casual |
| Default | Business Casual |
| Visibility | Everyone |
Live Stream URL
| Setting | Value |
|---|---|
| Label | Live Stream URL |
| Type | URL |
| Required | Yes |
| Placeholder | https://zoom.us/… |
| Visibility | Logged-in Users |
Registration Deadline
| Setting | Value |
|---|---|
| Label | Registration Deadline |
| Type | Date |
| Required | Yes |
| Visibility | Everyone |
Tips
- Create your reusable field library before creating events.
- Reuse the same fields across multiple events for consistency.
- Use visibility controls to show attendee-only information after registration.
- Combine Advanced Fields with Event Categories and Custom Templates to build rich, information-heavy event pages without custom development.


