
Overview
Attendee Information Fields allow you to collect additional information from each attendee during ticket registration. While Eventixa automatically collects essential details such as the attendee’s Name and Email Address, you can create custom fields to gather any extra information required for your event.
These fields are associated with individual ticket types, giving you the flexibility to collect different information for different attendees. For example, a VIP ticket may request a company name and dietary preferences, while a workshop ticket may ask for experience level or T-shirt size.
Why Use Attendee Information Fields?
Every event has different registration requirements. Custom attendee fields help you collect the information you need before the event begins.
Common use cases include:
- Company Name
- Job Title
- Phone Number
- Dietary Requirements
- T-Shirt Size
- Emergency Contact
- LinkedIn Profile
- Website
- Passport Number
- Meal Preference
- Experience Level
- Special Accessibility Requirements
- Additional Notes
Accessing Attendee Information Fields
To configure attendee information fields:
- Go to Events.
- Create or edit an event.
- Open the Tickets & RSVP section.
- Create or edit a ticket.
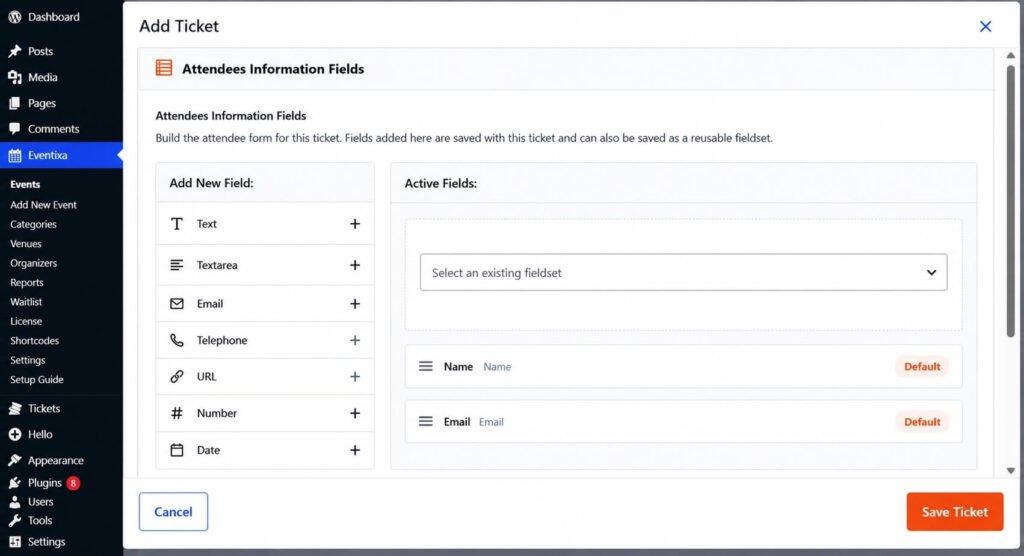
- Expand the Attendee Information Fields section.
Here you can build the registration form for that specific ticket.
Default Fields
Every Eventixa ticket automatically includes two default attendee fields:
- Name
- Email Address
These fields are required for attendee registration and cannot be removed.
Available Field Types
Eventixa supports multiple field types, allowing you to build forms that match your registration requirements.
| Field Type | Description |
|---|---|
| Text | Single-line text input for short answers. |
| Textarea | Multi-line input for comments or notes. |
| Email address with built-in validation. | |
| Telephone | Phone number field. |
| URL | Website or profile link. |
| Number | Numeric values only. |
| Date | Date picker for selecting dates. |
| Time | Time picker. |
| Select | Dropdown list with predefined options. |
| Radio | Single-choice option list. |
| Checkbox | One or more selectable options. |
Adding a New Field
To add a custom field:
- Open the Attendee Information Fields section.
- Select the desired field type from the Add New Field panel.
- Configure the field settings.
- Save the ticket.
The field is immediately added to the ticket registration form.
Field Settings
Each custom field can be configured using the following options.
Label
The field title displayed to attendees.
Example:
Company NamePlaceholder
Optional helper text displayed inside the input field.
Example:
Enter your company nameHelp Text
Additional instructions displayed below the field.
Example:
Required for issuing your attendee badge.Required Field
Enable this option to make the field mandatory during registration.
If enabled, attendees cannot complete registration until the field has been completed.
Field Options
For Select, Radio, and Checkbox fields, you can define the available choices.
Example:
Vegetarian
Vegan
Gluten-Free
No Preference
Each option should be entered on a separate line.
Reordering Fields
You can easily rearrange fields using drag-and-drop.
The displayed order determines how fields appear on the registration form.
Fieldsets
If you frequently use the same group of attendee fields, you can save them as a reusable Fieldset.
Examples:
- Conference Registration
- Workshop Registration
- VIP Guests
- Sponsors
- Media Registration
Saved fieldsets can be reused across multiple tickets without recreating the same fields.
Using Existing Fieldsets
Instead of building fields from scratch:
- Open the Select an existing fieldset dropdown.
- Choose a saved fieldset.
- Apply it to the current ticket.
This saves time and ensures consistency across events.
Registration Experience
During registration, attendees complete all required fields before submitting their booking.
For example:
Name
Email Address
Company
Job Title
Dietary Preference
Phone Number
The submitted information is securely stored with the attendee record.
Viewing Collected Information
After registration, attendee information is available from:
- Event → View Attendees
- Eventixa → Attendees
- Booking Details
Depending on your Eventixa edition and workflow, attendee data can also be exported for reporting and event management.
Editing Fields
You can edit attendee fields at any time to:
- Change labels
- Update placeholders
- Modify help text
- Add or remove options
- Mark fields as required or optional
- Reorder fields
Changes apply to future registrations. Existing attendee responses remain unchanged.
Removing Fields
Custom fields can be removed if they are no longer required.
Removing a field prevents it from appearing on future registration forms but does not modify information already collected from existing attendees.
Best Practices
- Keep registration forms short and easy to complete.
- Only collect information that is necessary for your event.
- Use descriptive labels that attendees can easily understand.
- Mark only essential fields as required.
- Create reusable fieldsets for events with similar registration requirements.
- Group related fields together to improve the registration experience.
- Review collected attendee information before the event to identify missing or incomplete details.
Example Registration Form
| Field | Type | Required |
|---|---|---|
| Name | Default | Yes |
| Email Address | Default | Yes |
| Company Name | Text | Yes |
| Job Title | Text | No |
| Phone Number | Telephone | No |
| Dietary Preference | Select | No |
| T-Shirt Size | Radio | Yes |
| Accessibility Requirements | Textarea | No |
Tips
- Use Text or Textarea fields for custom responses.
- Use Select, Radio, or Checkbox fields when you want attendees to choose from predefined options.
- Save frequently used forms as Fieldsets to quickly reuse them across multiple events.
- Keep required fields to a minimum to improve registration completion rates and provide a smoother booking experience.


